How to Make a Perfect Art Between Anchor Points Illustrator
This chapter is from the book
Drawing rectangles, ovals, and stars is nice, but that'southward not why y'all employ Adobe Illustrator. The true power of Illustrator is that y'all can use it to create custom shapes as you lot demand them—this allows yous to tweak a design to perfection. Illustrator comes with a variety of tools and functions, each with its own strengths and uses. Whether it's the mystifying Pen tool, the Live Paint feature that allows you to edit and colour vector objects more than freely, or the dependable Pathfinder and path functions that take helped brand Illustrator so powerful over the years, this chapter reveals the true art of the vector path.
Drawing and Editing Free-Class Vectors
Strip away the cool effects. Forget all the fancy tools. Ignore the endless range of gradients and colors. Look past the veneer of both print and Web graphics. What you're left with is the basis of all things vector—the anchor point. You can larn to master every shape tool in Illustrator, but if yous don't have the ability to create and edit individual anchor points, yous'll find it difficult to design freely.
Illustrator contains a range of tools that yous can use to fine-tune paths and edit anchor points. At offset, information technology might seem like these all perform the same functions, but upon closer inspection, y'all'll find each has its use.
Mastering the Pen Tool
Only the mention of the Pen tool sends shivers downward the spines of designers throughout the world. Traditionally, Illustrator's Pen tool has frustrated many users who have tried their hand at creating vector paths. In fact, when the Pen tool was introduced in the outset version of Illustrator in 1987, give-and-take had it that John Warnock, the brain and developer behind Illustrator, was the but ane who really knew how to apply it. In truth, the Pen tool feels more like an engineer's tool rather than an artist'due south tool.
But don't let this prevent you from learning to use information technology.
Learning how to use the Pen tool reaps numerous rewards. Although the Pen tool first appeared in Illustrator, you'll now find information technology in Adobe Photoshop, Adobe InDesign, and Adobe Flash; if yous know how to use it in Illustrator, you tin employ information technology in the other applications as well. Y'all can employ the Pen tool to tweak any vector path to create the verbal shape yous need, at whatever fourth dimension. Additionally, if y'all give yourself a hazard, y'all'll see that there's a method to the madness. Later on learning a few uncomplicated concepts, yous'll quickly realize that anyone can apply the Pen tool.
Usually, when new users select the Pen tool and endeavor to draw with it, they click and drag information technology the same manner they might use a normal pen on paper. They are surprised when a path does not appear onscreen; instead, several handles appear. At this point, they click again and drag; now a path appears, only it is totally not where they wait it to announced. This experience is sort of like grabbing a hammer by its head and trying to drive a nail past whacking it with the handle—information technology's the right tool, but information technology's beingness used in the wrong way.
While we're discussing hammers, permit's consider their function in producing cord fine art. When you lot go to create a piece of string art, you beginning start with a piece of wood, then you hammer nails role of the way into it, leaving each nail sticking out a bit. Then you accept colored thread and wrap information technology effectually the exposed nail heads, thus creating your art. The design you lot create consists of the strands of colored thread, but the thread is held and shaped past the nails. In fact, you can say that the nails are like anchors for the threads.
When y'all're using the Pen tool in Illustrator, imagine you lot're hammering those little nails into the wood. In this situation, you lot aren't cartoon the shape itself; instead, you're creating the anchors for the shape—the Bézier ballast points. Illustrator draws the thread—the path—for yous. If you call up about drawing in this way, using the Pen tool isn't complicated at all. The hard role is just figuring out where you demand to position the anchors to get the shape you need. Learning to position the anchors correctly comes with experience, simply you tin get started by learning how to depict simple shapes.
Cartoon Objects with Straight Paths
Follow these steps to apply the Pen tool to describe a straight path:
-
Select the Pen tool, and click the artboard once—exercise not click and drag.
Clicking once with the Pen tool creates a corner ballast signal. This ballast indicate is the outset betoken of your path.
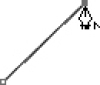
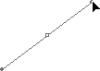
- Now, move your pointer to where you want the end bespeak of your path (Effigy iv.i); click again to define a 2nd corner ballast signal.

Figure four.1 In one case you've clicked once to create the first anchor point, movement your arrow to the location where you desire the second anchor bespeak.
Once you create this 2d point, Illustrator automatically connects the two ballast points with a straight path, completing the line (Figure iv.two).
Effigy iv.two Clicking a second time creates the path between the 2 anchor points. No clicking and dragging is necessary.
For now, the starting time concept becomes clear: when you're using the Pen tool, clicking—not dragging—is what defines a corner anchor bespeak.
At this point, with your Pen tool nonetheless selected, Illustrator assumes you desire to add together points to your path. By clicking again, yous can create a 3rd corner anchor point, and if y'all do, Illustrator draws a path to connect the second anchor point to the newly created 1 (Figure four.three).

Figure four.3 Each successive click with the Pen tool continues to create additional path segments.
Absolutely, this behavior may show confusing because you lot may take been expecting to start a new path rather than add to the existing one. To commencement a new path, you offset have to deselect the current path. The easiest style to exercise this is to click a blank area on the artboard while pressing the Command (Control) cardinal, which temporarily changes your tool to the Selection tool. Once you lot've deselected the path, you can click with the Pen tool to start cartoon a new path.
So now you lot empathize a 2d concept: when drawing an open path with the Pen tool, each click adds another anchor indicate to the path until yous deselect the path, which is how you betoken to Illustrator that y'all've finished that path.
You tin can bespeak that you lot've finished drawing a path in some other fashion—by cartoon a closed path. Until now, you've been creating open paths, only at present yous can endeavor to create a closed shape—in this case, a triangle:
- With nothing selected, select the Pen tool, and click one time to define the kickoff anchor signal of the triangle.
- Motion the pointer to another office of the artboard, and click over again to define the second point.
- Now move the pointer in one case more than, and click to define a 3rd anchor point (Effigy four.4). A triangle has three sides, and then you have all the ballast points you demand, but at the moment, the object you've fatigued is an open up path.
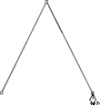
Figure 4.4 A triangle needs three anchor points; the third click creates 2 path segments.
- To complete the shape, move the pointer and so it rests directly on the outset anchor signal that you defined, and click once to shut the path (Effigy 4.5). At this point, if you lot click again elsewhere on the artboard, the Pen tool starts drawing a new path.
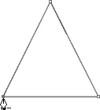
Figure 4.5 Clicking the showtime anchor signal completes the shape. This is the shape afterward it has been closed.
This brings united states to a tertiary concept: when y'all create a closed path, the next click with the Pen tool starts a new path.
If this sounds confusing, try it once or twice, which should help—particularly if you pay attention to your Pen tool pointer. When you're using the Pen tool, the pointer changes every bit you draw, helping y'all understand the three concepts you lot've just learned. When the Pen tool is going to start creating a new path, a small Ten appears at the lower right of the icon; when the Pen tool is going to add together anchor points to an existing selected open path, no icon appears adjacent to it; and when the Pen tool is going to shut a path, a small O appears at the lower right of the icon (Effigy 4.vi).
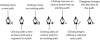
Effigy 4.6 The Pen tool shows subtle indications in its icon that let you know the role it will perform.
Drawing Objects with Curved Paths
The paths you've drawn up until this bespeak were all made up of corner anchor points, which are connected with directly lines. Of course, yous'll besides need to create paths with curved lines; this section explains what yous need to know.
In Affiliate two, Vectors 101, yous learned that curves are defined with management handles, which control how the paths betwixt anchor points are drawn. When you lot desire to describe a curved path, you follow the same basic concepts you lot learned for creating direct paths, with one additional step that defines direction handles:
- To draw a curved path, select the Pen tool, and brand sure an existing path isn't selected. Position your pointer where you want to brainstorm your path, and then click and elevate outward before releasing the mouse (Figure iv.vii). This action creates a smooth ballast point where you commencement clicked and defines direction handles at the indicate where you released the mouse.
Effigy 4.7 Clicking and dragging with the Pen tool defines the smooth anchor point and, at the same time, allows you to position the management handles.
-
Now position your pointer where yous want the next ballast point to be, and click and drag one time over again (Figure 4.8).
Using the management handles equally guidance, Illustrator draws a curved path connecting the 2 smooth anchor points.
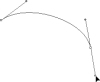
Figure four.8 Clicking and dragging a 2d fourth dimension completes a curved path betwixt the starting time two anchor points and defines the adjacent curve that volition exist drawn.
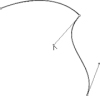
- Move your pointer to another location on your artboard, and click and drag to create a 3rd smooth anchor bespeak.
- Click and drag the first anchor indicate to close the path (Figure four.9).
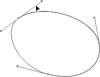
Figure 4.9 Clicking and dragging on the get-go anchor bespeak completes the curved shape.
We can now define a fourth concept: clicking and dragging with the Pen tool creates a polish ballast bespeak and defines its direction handles.
Learning to anticipate how the placement of direction handles creates the path you lot want takes time, but you don't have to become it right the first time. Once y'all create a shine anchor point, you can switch to the Direct Option tool and click and drag the anchor point to reposition information technology (Figure 4.10). Additionally, when y'all select a smooth anchor point at whatsoever time, the direction handles become visible for that anchor signal, and you tin use the Direct Selection tool to reposition those also.
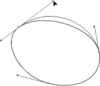
Figure iv.ten Using the Direct Pick tool, you lot tin can change the position of anchor points and direction handles to arrange a curved path.
Drawing Objects with Both Straight and Curved Paths
In the real-design world, shapes consist of both straight and curved lines. You can use the noesis yous've gained up until this point to create paths that contain a mixture of both corner and polish anchor points. Basically, you know that clicking with the Pen tool produces a corner anchor indicate and a direct line, and you know that dragging with the Pen tool produces a polish anchor point and a curved line.
Try drawing a path with both types of anchor points:
- Select the Pen tool, and brand sure you lot don't have an existing path selected (expect for the minor X icon on the Pen tool arrow). Click once to create a corner anchor point.
- Move your pointer, and click again to create a straight line (Figure 4.11).
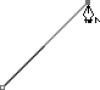
Figure iv.xi You tin can brainstorm a new path by creating two corner anchor points to make a straight line.
- Movement your arrow, and click and drag to create a smooth anchor point.
You at present have a single path that consists of both a straight line and a curve (Effigy 4.12).
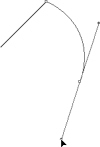
Figure iv.12 Adding a polish ballast point creates a single path with both direct and curved paths.
You tin can use Illustrator'due south Convert Ballast Indicate tool to convert a corner anchor point to a smoothen ballast point, and vice versa. To do so, cull the Convert Anchor Point tool (which is grouped with the Pen tool), and apply the same concepts you've learned. Click an existing anchor point once to convert it to a corner ballast point, so click and elevate an existing anchor point to pull out management handles and convert it to a smooth anchor point.
Changing Direction on a Path
Every bit you lot were creating shine anchor points, you may take noticed that when y'all are creating or editing management handles, a mirror effect occurs. On a smooth anchor point, the management points are e'er opposite each other, and editing 1 seems to affect the other. Remember that the direction handles control how the path passes through the ballast indicate, so the direction handles are always tangential to the curve (Effigy iv.13).
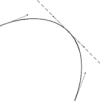
Figure 4.13 With a smooth anchor point, the management handles are always tangential to the curve of the path.
Yous can, however, change the direction of a path as information technology passes through an anchor indicate:
- Use the Direct Selection tool to select a smooth anchor point.
-
Switch to the Catechumen Ballast Indicate tool, and click and drag one of the direction handles (not the anchor point).
In essence, this creates a combination indicate, which yous can then go along to edit with the Direct Selection tool (Figure four.fourteen).
Effigy 4.14 Clicking and dragging a direction handle with the Convert Anchor Point tool creates a combination anchor point.
To make life easier, you can create combination points as yous draw with the Pen tool:
- Start by clicking and dragging to create a smooth anchor indicate.
- Motion your pointer to a different position, and click and elevate again to create another polish anchor point and, hence, a curved path.
- Now, position your pointer direct on the 2d anchor indicate you just created. You'll discover that the Pen tool icon shows a small inverted 5 in its icon.
- Click and drag the anchor bespeak while holding the Selection (Alt) key to drag out a single direction handle (Figure 4.15).
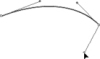
Figure iv.15 Every bit y'all're drawing a path with the Pen tool, yous can create a combination point by clicking and dragging the last anchor point of the path while holding the Pick (Alt) fundamental.
- Motility your pointer to another location, and click once more; you'll see that yous've created a combination point.
Converting Type to Outlines
Overall, using the Pen tool takes some getting used to, and if you're going to use Illustrator often, it's best to practice. While practicing, you might discover information technology useful to convert some type to outlines (choose Type > Create Outlines) to see how the anchor points are positioned in those shapes (Figure four.16). Attempt to re-create them on your own, and get a feel for when you need a corner anchor point and when you need a smooth anchor point. The more you use the Pen tool, the easier information technology volition be to use.

Figure four.16 When y'all're learning to use the Pen tool, it can exist helpful to convert some blazon characters to outlines and then you tin can written report the placement of the ballast points and direction handles. Choose Select > Object > Direction Handles to see the direction handles for an entire shape at once.
Adding and Deleting Anchor Points
Considering anchor points are used to define paths, y'all must add together and delete points from a path to reach the shapes you need. You lot may think you can select an anchor point with the Direct Selection tool and simply printing the Delete key on your keyboard, but doing this deletes a portion of the path (Figure 4.17). Although this may be useful at times, what you lot really want is to continue the path just remove the anchor point.

Figure 4.17 Using the Straight Selection tool to select and delete an anchor point (left) too deletes the connecting path segments (middle). The Delete Anchor Point tool keeps the path closed merely removes the anchor point (right).
To delete an anchor point from a path without deleting the path, select the Delete Anchor Point tool, and click the anchor betoken one time that you want to remove. Likewise, y'all can switch to the Add together Anchor Point tool and click a selected path anywhere to add together a new anchor point to the path (Figure 4.18). As an culling, you can click the Remove Selected Ballast Points button in the Control console. Notation that this button will non appear when all ballast points of a path are selected.
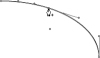
Figure 4.18 The Add together Anchor Point tool enables yous to add together new anchor points to an existing path.
Illustrator tries its all-time to help you lot get your work done, just sometimes its overzealousness gets in the way. By default, when y'all move your pointer over an existing path with the Pen tool, Illustrator, thinking y'all want to add together a point to the existing path, conveniently switches to the Add Ballast Betoken tool. Likewise, when y'all move your arrow over an existing anchor bespeak, Illustrator switches to the Delete Ballast Signal tool, thinking you want to remove that anchor point. This is great, unless you wanted to kickoff cartoon a new path with the Pen tool on elevation of an existing selected path. You can turn this feature off by checking the Disable Car Add/Delete option in the Full general panel in Preferences, which politely tells Illustrator, "Thanks, but no thanks."
Drawing with the Pencil Tool
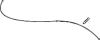
To draw with the Pencil tool, but click and drag on the artboard. As y'all drag, you'll see a calorie-free path trail the movement of your pointer (Figure 4.19). Subsequently y'all release the mouse, Illustrator creates the anchor points necessary and creates a vector path for yous (Figure 4.twenty).

Effigy 4.nineteen Equally you elevate with the Pencil tool, a faint line traces the path of your arrow.

Figure 4.xx After you release the mouse, Illustrator creates anchor points as necessary and displays the drawn path. Depending on your mouse control, the path may have a jittery advent.
Considering drawing with the Pencil tool relies on how steadily you handle your mouse or tablet pen, you can employ several tools and settings to assist create better-looking paths.
The Smooth tool, which you'll find grouped with the Pencil tool in the Toolbox, is a tool you can use to fe out the wrinkles of whatsoever selected vector path. Select whatever vector path, and click and elevate over information technology with the Smooth tool. Doing this repeatedly makes the vector path smoother and smoother. The angles in the path become smoother, and the path itself modifies to match the contour of the direction in which you drag with the Smooth tool (Effigy 4.21).
Effigy iv.21 Using the Smooth tool repeatedly on a path tin can enhance its appearance.
Double-clicking the Pencil tool or the Smooth tool opens the Pencil Tool Preferences dialog, allowing you to specify that tool's beliefs (Figure 4.22).
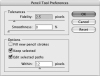
Figure four.22 Selecting the Edit Selected Paths selection allows you to easily reshape or adjust existing paths.
- Fidelity, Smoothness. Available for both the Pencil and Smooth tools, the Fidelity setting determines how close the vector path is drawn in relation to the movement of your mouse or input pen. A lower Allegiance setting results in a path that more closely matches the exact movement of your mouse. A higher Fidelity setting results in a path that is smoother and less jittery merely that may not friction match your stroke exactly. If you're good with handling the mouse or if you're using an input pen, y'all might get with a lower setting. If you take trouble controlling the mouse or pen precisely, y'all might benefit from a higher Fidelity setting. The Smoothness setting refers to how much smoothing Illustrator applies to paths every bit yous draw them. The higher the Smoothness setting, the fewer anchor points you'll see on your paths. If you're looking for more fluid strokes, increasing the Smoothness setting will assist.
- Make full New Pencil Strokes. By default, Illustrator creates paths drawn with the Pencil tool as paths with a stroke just no fill. In Chapter ii, Vectors 101, yous learned that fifty-fifty open paths tin can have fills and that checking this option gives you the ability to choose a fill color and create filled paths as y'all describe them with the Pencil tool. This setting is available for the Pencil tool only, not for the Polish tool.
- Keep Selected, Edit Selected Paths. With Illustrator'southward default behavior, when you draw a path with the Pencil tool, the path becomes selected equally soon as you lot complete information technology. You tin alter this beliefs by deselecting the Keep Selected pick. When the Edit Selected Paths option is selected and your pointer is within the specified number of pixels from an existing selected path, Illustrator allows you to modify the selected path by but drawing over it with the Pencil tool. This can exist helpful because it allows you to tweak a path to perfection as you are drawing it, almost as if you were using the Smooth tool. Where this gets in the way, however, is when you lot intend to draw a new path just inadvertently end upward editing a path that is selected instead. This can happen ofttimes if you have the Keep Selected selection turned on. Many designers prefer to turn off the Continue Selected option but leave on the Edit Selected Paths choice. This way, if they do demand to edit a path, they can Command-click (Control-click) a path to select information technology; at this signal, the Edit Selected Paths feature lets them draw over information technology.
You tin can likewise apply the Path Eraser tool to remove parts of a vector path. It'south important to realize that the Path Eraser tool is not akin to the Eraser tool found in pigment programs, which you lot can use to merely erase pixels at will (however, Illustrator has an Eraser tool that does simply that, which we'll talk about shortly). You utilize the Path Eraser tool specifically to erase portions of a selected vector path. As yous trace over an existing selected path with the Path Eraser tool, a low-cal path appears to trail the movement of your pointer. When you release the mouse, Illustrator deletes the portion of the path y'all've traced.
Using the Reshape Tool
Using the Direct Selection tool to select individual points on a path results in some anchor points moving while others remain stationary. In virtually kinds of path editing, this is the desired beliefs, although it tin can result in paths that appear distorted (Figure 4.23). At times, you may want to stretch a path past moving selected points, but yous may as well want other points to move as necessary to maintain a nondistorted path appearance. The Reshape tool is perfect for this task.

Figure 4.23 Although you can always select individual points on a path and move them, yous may not get acceptable results.
- Select a path using the Selection tool, and then select the Reshape tool.
-
Click an anchor signal or a part of a path that you want to act as a focus signal when you stretch the path. This mode, you'll have the most command over how this focused point is moved.
You tin can also hold the Shift key and select boosted focus points (too equally drag to marquee-select additional anchor points).
-
In one case you've selected your focus points, click and elevate one of the focus points to reshape the path.
You'll discover that as the points that are in focus move, other points in the path move as well to continue the full general proportion of the path (Figure 4.24).

Figure 4.24 Using the Reshape tool, you lot can stretch paths and reshape them without telltale distortion.
Using the Eraser Tool
Illustrator CS3 features a new tool called the Eraser tool. Unlike the Path Eraser tool, the Eraser tool works equally you would wait—it simply erases parts of objects. That being said, the Eraser tool has a variety of settings, and you should know about some "side effects" besides.
Y'all'll find the Eraser tool in the lower part of the Tools panel, grouped with the Pair of scissors and Knife tools (Effigy iv.25). To utilize the Eraser tool, select it, and then click and drag over any object (or objects). If zilch is selected, the Eraser tool will erase all objects beyond all layers in your certificate, with the exception of locked layers, of course (Figure 4.26 on the following page). For more command, y'all can make a selection get-go and so use the Eraser tool, at which time the tool will erase just those objects that are selected (leaving all other objects intact).
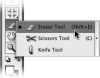
Figure four.25 The Eraser tool (not to be confused with the Path Eraser tool) is grouped with other tools that cutting or sever objects.

Figure 4.26 A single swipe with the Eraser tool erases all objects in its path.
It's important to realize that although the Eraser tool is cool and makes information technology seem effortless to quickly remove parts of an illustration, the tool still must bide by the general rules of how vector objects are drawn. This means if y'all try to erase function of a unmarried closed path, the outcome volition be ii airtight paths, not open up ones. Information technology'due south easiest to see this when attempting to erase paths that contain strokes (Effigy 4.27). In addition, although you can certainly use the Eraser tool to erase portions of a stroke, you must reapply the strokes to each segment of the resulting path (Figure 4.28). In the latter example, you can get effectually this by outset applying the Object > Path > Outline Stroke command before using the Eraser tool. The same applies when trying to erase paths with brushes applied (refer to Chapter five, Brushes, Symbols, and Masks, for more information on brushes).

Figure 4.27 Although you may initially expect the eraser to simply remove an area from an object (left), the result will actually exist two closed shapes (correct).

Effigy 4.28 If a stroke has the Round Cap option specified, the eraser may appear to create a clean interruption while you're using it (left), but the result will exist ii paths, each with its ain respective round cap appearance (correct).
Once y'all get used to the behavior of the Eraser tool, it becomes a useful (and fun!) tool to utilize. Even better, yous can adjust some actually powerful settings to get the full potential of the Eraser tool. Outset, you can adjust the size of the eraser past tapping the subclass keys on your keyboard (only as you would adapt brush size in Photoshop). You tin can also double-click the Eraser tool in the Tools console to open up the Eraser Tool Options dialog (Effigy 4.29). You can manually arrange the numerical values for the bending and roundness of the Eraser tool, or you lot tin click and drag the blackness dots and the arrow in the preview nearly the tiptop of the dialog to adjust those values visually. You can adjust the size of the bore of the eraser as well.
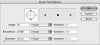
Figure 4.29 The Eraser Tool Options dialog offers command over how the Eraser tool works.
By default, all the values are fixed, meaning they remain consistent as you employ the Eraser tool. Nonetheless, you can choose to brand the values random and select a variation for each setting. Even better, if you have a pressure-sensitive tablet (such as the one from Wacom, for instance), you tin choose other variables including Pressure (Figure iv.30). For case, setting Diameter to Pressure with a high Variation value gives you the power to erase with more control and flexibility (Figure four.31).
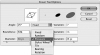
Figure iv.30 When choosing variable settings such as Pressure level, the preview window in the Eraser Tool Options dialog displays the minimum, median, and maximum sizes of the eraser.

Figure 4.31 Past applying pressure with a Variable setting for the eraser, you can achieve natural-looking results not possible with a mouse.
Cutting Paths with the Scissors and Knife Tools
When editing paths, y'all might find you lot need to cut or split a path at a sure point. With the Pair of scissors tool selected, you can click whatever topmost vector path (selected or non) to cut the path. In essence, you lot create two anchor points past doing this. The Scissors tool tin cut simply one path at a time.
The Knife tool is much like the Pair of scissors tool, simply you cut or split up a path by dragging the pointer across a path instead of clicking it. Whereas using the Scissors tool results in an open up path, using the Knife tool results in at to the lowest degree two closed paths (Effigy 4.32). The Knife tool cuts through multiple paths when nothing is selected, merely cuts through but objects that are selected (fifty-fifty if those selected objects appear beneath other objects).
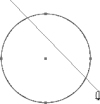
Figure iv.32 Using the Knife tool to slice a single object results in two separate closed paths.
Using the Pair of scissors or Pocketknife tool is unwieldy at best, and you may find that if yous're doing a lot of path editing, you'll get better results using Live Paint groups, which are covered later in this affiliate.
Source: https://www.peachpit.com/articles/article.aspx?p=784304
0 Response to "How to Make a Perfect Art Between Anchor Points Illustrator"
ارسال یک نظر